
How to Take Field Measurement for Toilet Partitions
- Mavi New York
- Field Work
- How to Take Field Measurement for Toilet Partitions
Precise Field Measurement of Toilet Partitions:
In commercial bathroom installations, precision isn’t just a matter of aesthetics—it’s about ensuring accessibility, privacy, and compliance with ADA and OSHA guidelines. At Mavi New York, we distinguish ourselves through our unwavering commitment to accurate field measurement. Our professionals don’t just measure spaces; they understand and navigate the complexities of each site, ensuring our installations meet the highest standards of precision and quality. This article will guide you through the meticulous process of measuring toilet partitions that sets Mavi New York apart, providing excellence in every project we undertake.
Step 1: Preparations and Tools
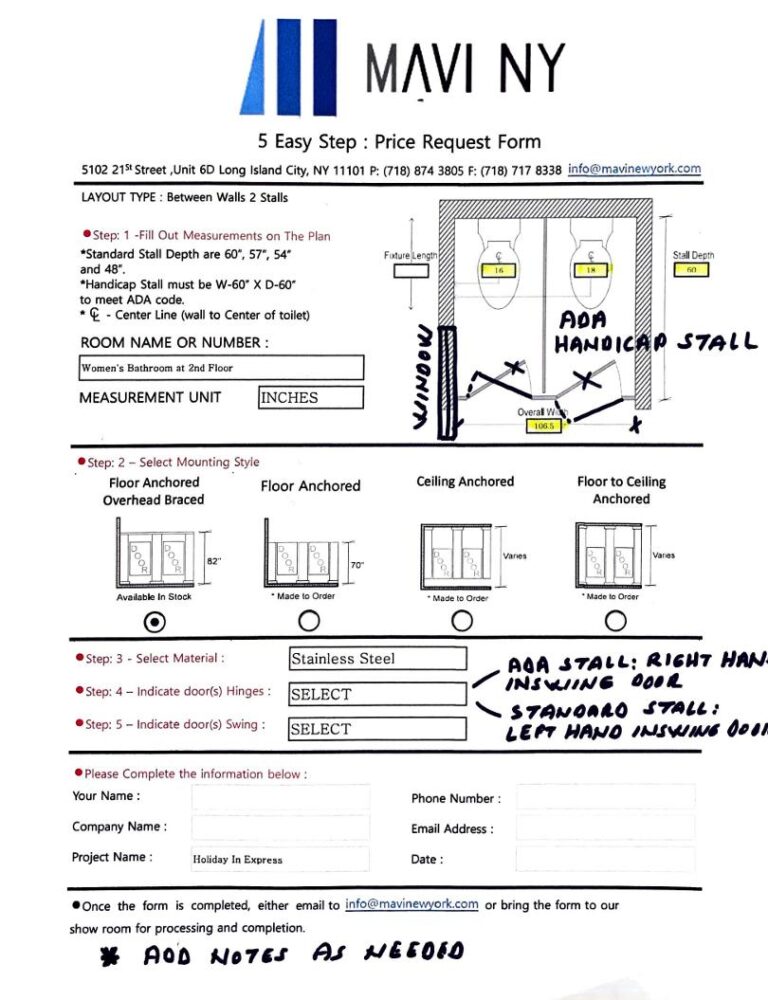
Before you can learn how to measure bathroom stalls, it’s crucial to be thoroughly prepared before embarking on a site visit. Gather your essential tools: a durable tape measure, a notepad for detailed sketches, a camera for capturing reference photos, and Mavi New York’s order form.
This preparatory step goes beyond just having the right equipment; it’s about entering the site with a mindset ready to assess, envision, and plan. Understanding the space’s layout, potential challenges, and unique features is critical to a successful installation.
Step 2: Marking Up the Worksite Image
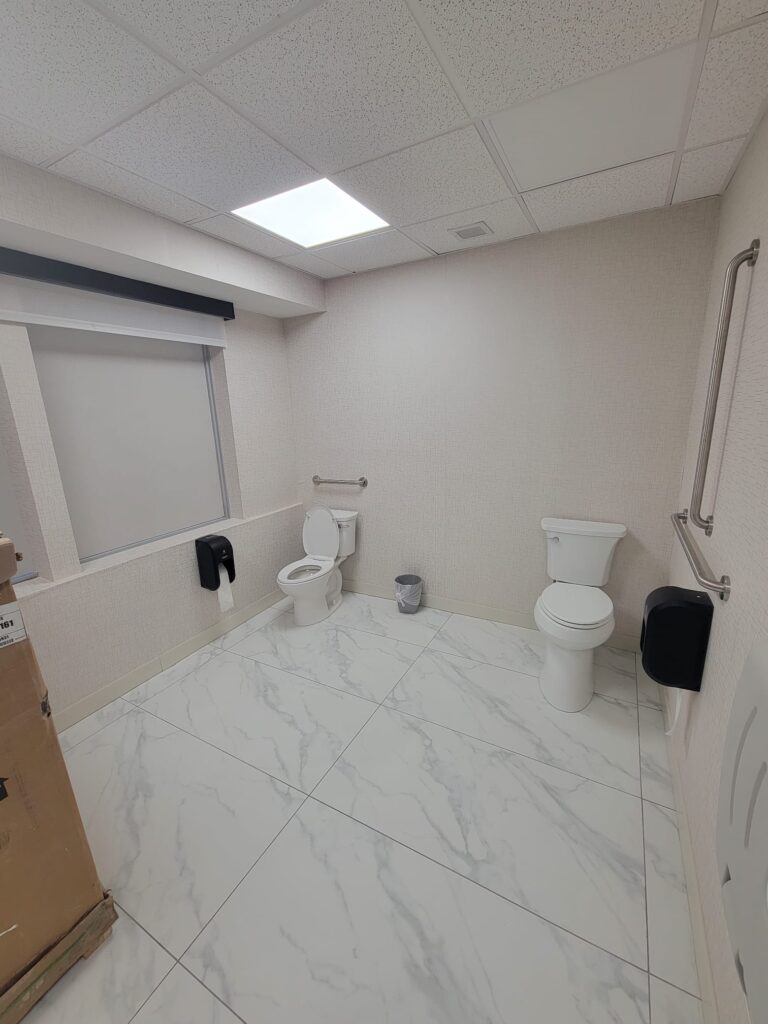
Before any measurements or forms are filled out, it’s essential to have an apparent visual reference of the space as it currently exists. Take some pictures of the job site showing the existing bathroom conditions. Please keep in mind that the wide-angle picture captures more details. Refer to the picture on the left, which captures both the left and right walls at the same time.
This visual is invaluable as it provides a snapshot of the space before any work begins, serving as a ‘before’ reference to guide the project’s progression. It’s crucial to capture the entire space, noting the locations of existing fixtures and any notable features that must be accommodated or worked around.
Step 3: Site Evaluation
With the image of the current space, the next step is to evaluate the site in detail. This evaluation goes beyond the visual, encompassing a complete understanding of how the space will interact with the new installations.
You’ll need to assess the condition of the existing structures, the materials of the walls and floors, and any potential challenges they may present. This is also the time to note the presence and location of windows, plumbing, electrical outlets, and any heating elements or ventilation systems, as these may impact both the design and installation of the partitions. This step ensures that all design decisions are made with a complete understanding of the site’s specific needs and potential limitations.
Step 4: Taking Field Measurements
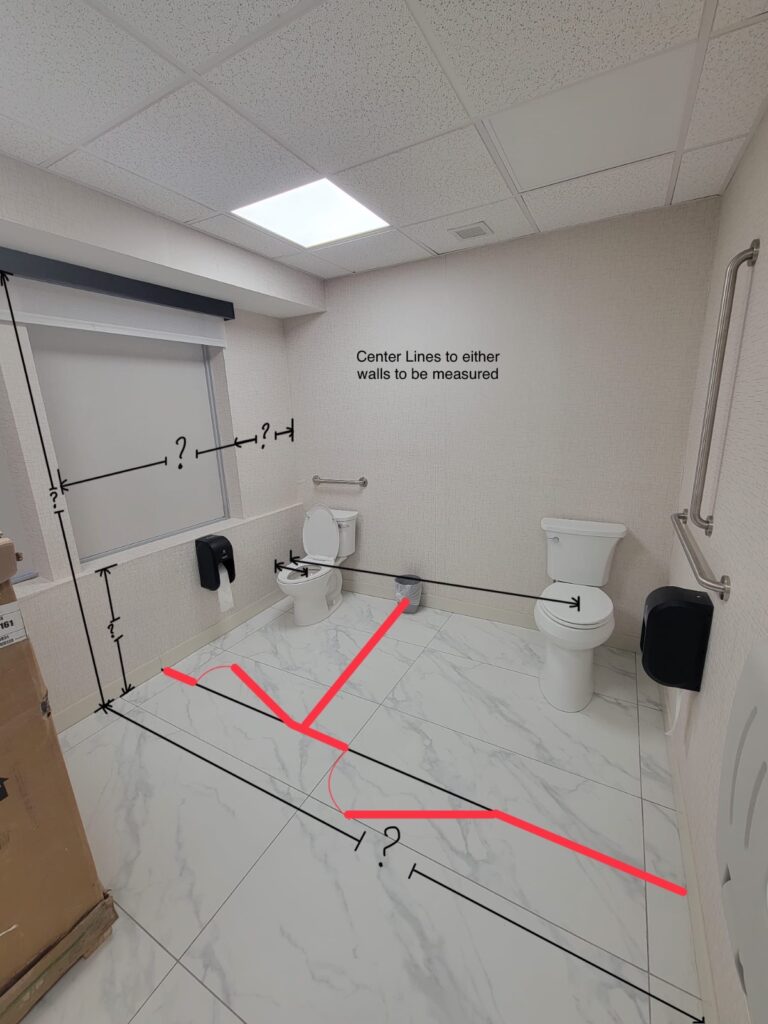
Taking field measurement is a critical step that forms the foundation for the partition design and installation process. This is where precision is paramount. Using the marked-up image, you’ll measure the dimensions of the entire space:
- Distance between walls
- The overall width of the workspace – for wall-to-wall layout, this is the same as the distance between walls
- Center Lines are the distance from the middle of every toilet bowl to a wall, either the left or right wall.
- Height – typically, this is floor to ceiling; sometimes, there are obstructions in the way that we need to account for – then, you also take the height from the floor to that obstruction.
- Depth – distance from the wall to the partition door – the standard distance is 60 inches.
- Dimensions of any possible obstructions (e.g., a soffit or a beam)
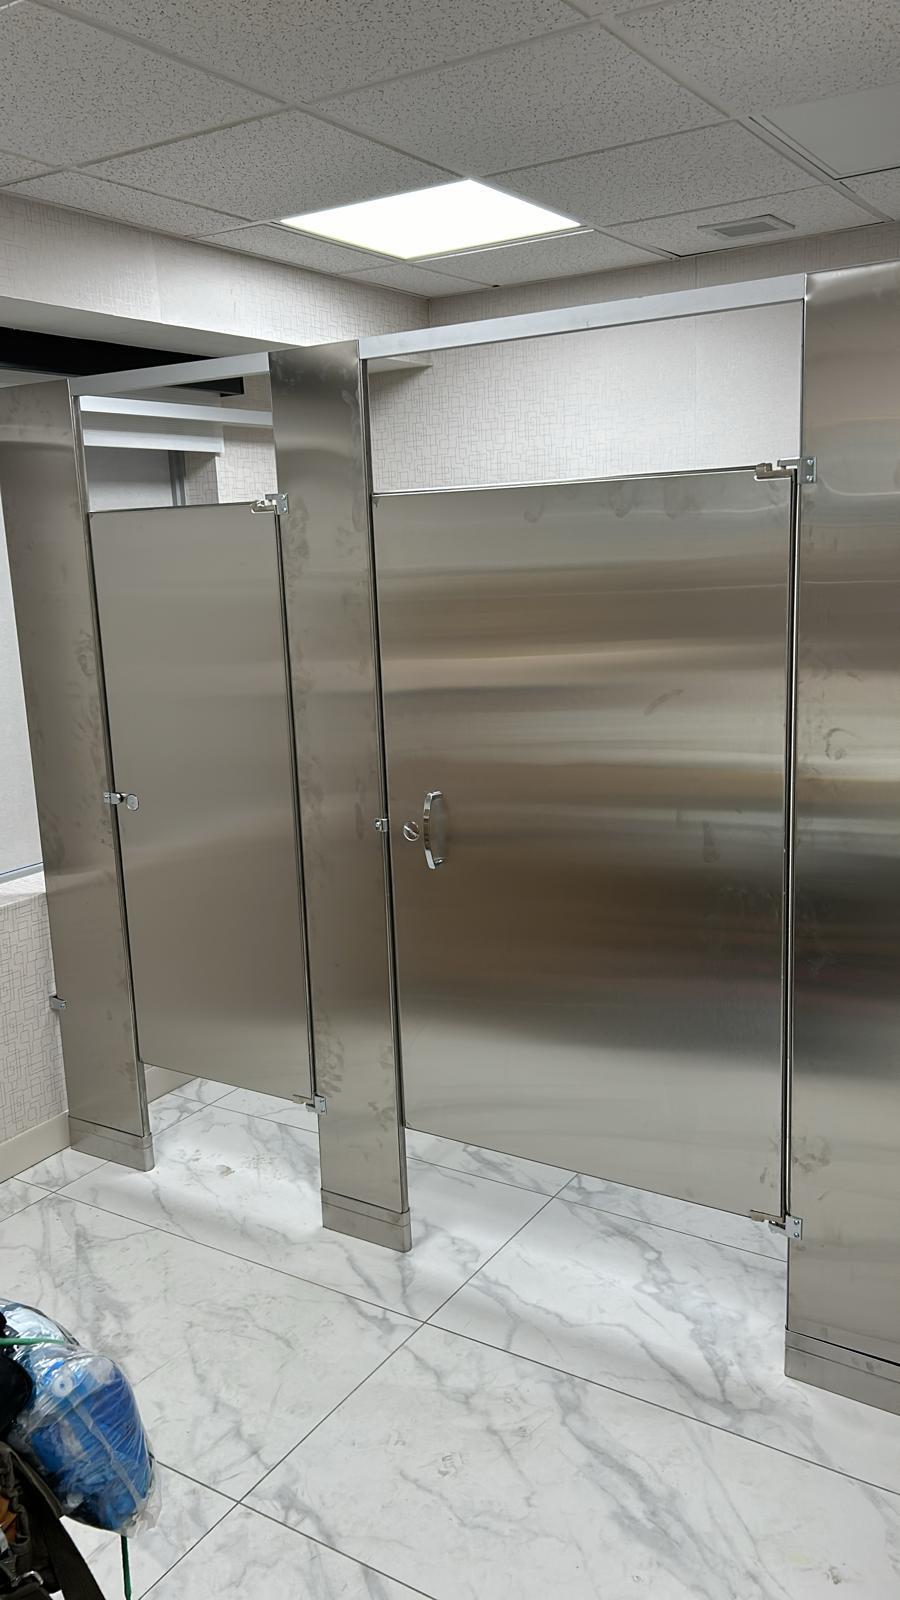
ADA compliance is crucial during this phase; measurements must be taken with the utmost care to ensure all installations meet the necessary regulations. In the image above, the stall on the right would be the ADA-compliant compartment. However, according to ADA guidelines, the contractor failed to install the grab bars correctly. The longest bar, which is 42 inches, would need to be horizontal on the right wall instead of upright as shown in the picture. The 36-inch bar, the second longest, would need to be on the back wall, with one end 12 inches from the center line and the other end extending 24 inches past the center line. The last bar (the one in the back of the left toilet) would have been the vertical bar. The image above highlights possible missteps that even professionals can make.
Step 5: Documenting Obstructions and Solutions
After conducting a thorough field measurement of the site, the next crucial step is to identify any potential obstructions that could impact the installation process. This includes fixed elements such as windows, beams, or plumbing that may influence the layout of the toilet partitions. It’s essential to recognize these obstructions and strategize how to effectively navigate or incorporate them into the design. This may involve customizing stalls, adjusting the installation approach, or creatively using materials to ensure that the final setup is both functional and aesthetically pleasing.
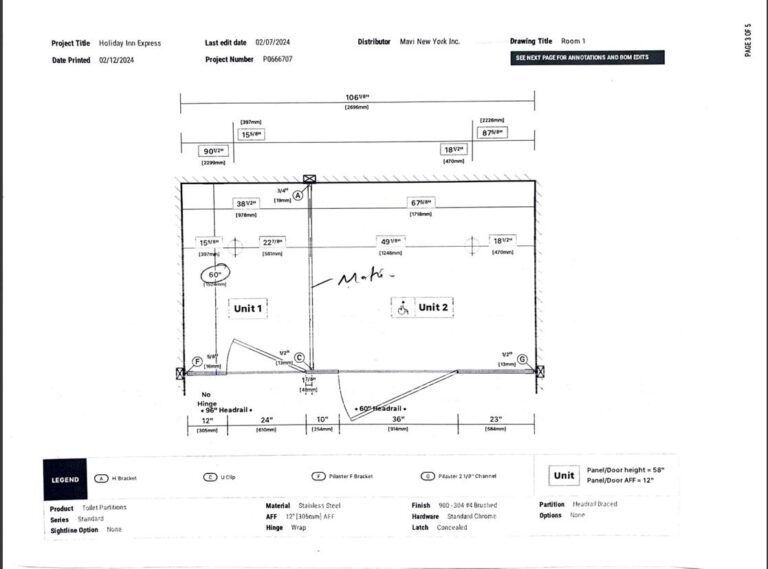
Step 6: Sketching the Layouts
Once all measurements and obstructions are documented, the next phase is to create a detailed sketch or layout of the proposed installation. At Mavi New York, our professionals utilize sophisticated software to convert rough sketches into precise architectural blueprints.
This digital representation is essential for visualizing the final setup and ensuring that all components fit together harmoniously within the given space. It’s also during this stage that any customization is carefully planned. For example, if a partition needs to be tailored to accommodate a window or an irregular wall angle, this will be meticulously mapped out. The digital layout is a critical tool for communicating with clients, installers, and all stakeholders to ensure clarity and alignment on the project’s vision.
Step 7: Preparing and Sending the Submittal Package
Once the layouts are sketched and digital blueprints are prepared, Mavi New York progresses to assembling the submittal package. This comprehensive package includes the shop drawings but also detailed specifications of the project, encompassing mounting styles, door styles, specific hinges, channels, and every other detail relevant to the installation. This meticulous compilation ensures that every aspect of the project is communicated clearly and concisely.
The submittal package is then dispatched to the client’s team for review. This critical step allows the client and their architects or contractors to examine the proposed plans, ensuring all details align with their vision and requirements. It’s an opportunity for them to suggest adjustments or confirm that everything is set to proceed as planned. This collaboration is crucial for aligning expectations and finalizing the details before the physical work begins.
Step 8: Review, Adjustments, and Final Approval
Following the client’s review of the submittal package, feedback is gathered and adjustments are made as necessary. This step is vital for addressing any concerns, making modifications to the designs, and ensuring that the final plan meets all requirements and expectations. It may involve revisiting the measurements, tweaking the design, or changing materials as requested by the client.
After making the required adjustments, the revised details are sent back to the client for final approval. This iterative process ensures that the project is tailored precisely to the client’s needs and specifications. Once the final approval is received, Mavi New York moves forward with the preparation for installation, confident in the knowledge that every detail has been reviewed, approved, and is ready for execution.
This approach not only reinforces the accuracy and quality of the installation but also fosters a positive, collaborative relationship with the client, ensuring their complete satisfaction with the final outcome.
Need a quick quote? Email your material choice, measurements, and ship to zip code to info@mavinewyork.com or call 718-874-3805 now!
